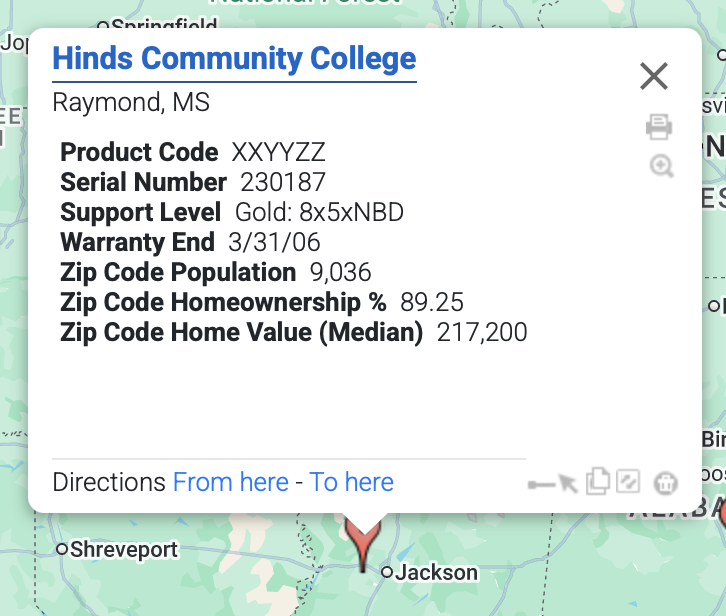
How to Create a UFO Sightings Map with Extended Label Pins

Creating a UFO Sightings Map: A Step-by-Step Guide

Have you ever gazed skyward and pondered our solitude in the universe? Indeed, reports of 
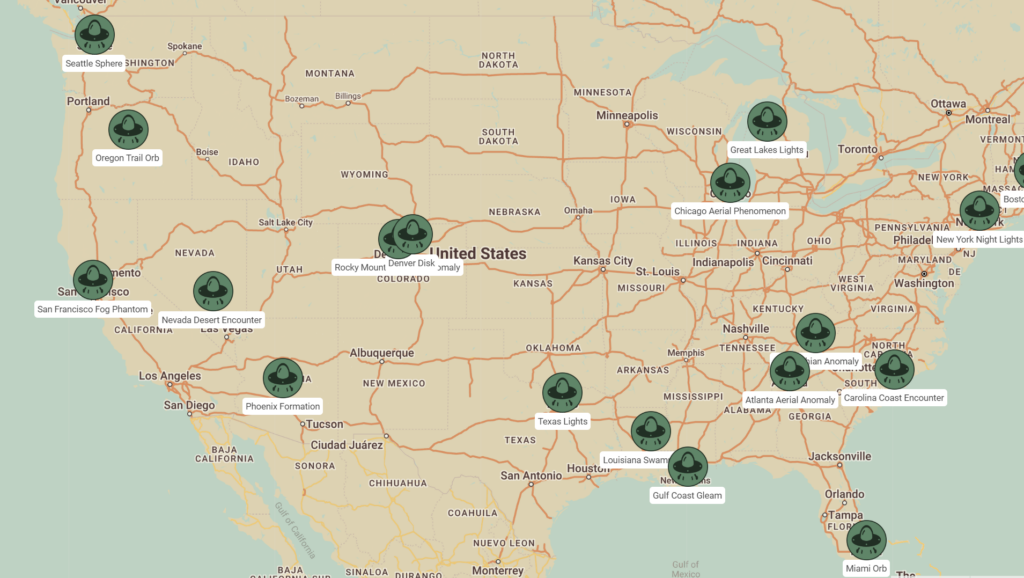
UFO sightings span across America, and with ZeeMaps’ latest feature, you now have the power to depict these enigmatic occurrences with unprecedented clarity. The days of being constrained to three-character map pin labels are behind us. Let’s embark on a journey to craft a detailed UFO sightings map featuring extended pin labels.

Step 1: Assemble Your UFO Sightings Data

Your adventure starts with gathering data. Collect incidents of UFO sightings, carefully recording their locations and specifics. For instance, notable examples include:

  • Texas Lights: July 2021 brought bright, unexplained lights to Dallas.
  • Nevada Desert Encounter: A low-flying, silver object made its presence known near Area 51 in August 2019.
  • Seattle Sphere: May 2019 witnessed a shimmering sphere in Seattle.

Ensure that each sighting bears a unique identifier to act as its map label.

Step 2: Create Your Map

Commence by creating a new map on ZeeMaps, importing your catalog of UFO sightings. Verify that one of your data fields encapsulates the complete descriptions or identifiers for labeling.

UFO Sighting Map

Step 3: Apply the Labels

Once you’ve uploaded your data, proceed to label your pins:

Begin by navigating to Map -> Settings.

Subsequently, select the Markers Display tab.

Then, use the dropdown menu in the “Label markers using field” section to select the data field with your UFO sighting identifiers.

Finally, hit Save Changes.

Step 4: Customize Your Map Display

With your pins now labeled, furthermore, you might consider enhancing their display:

  • In the Marker Icons settings, opt for larger pins to make your extended labels clearly visible.
  • Optionally, Choose File to upload an image file to replace markers for an added visual touch to your map.
UFO Sighting Map Icons

Step 5: Explore and Share Your UFO Sightings Map

At last, your map is now ready for exploration. Hence, we can delve into the patterns of sightings across the nation. Moreover, circulate your map among fellow UFO enthusiasts and contribute to our collective quest for understanding.

Conclusion: Embracing the Unknown

After all, your UFO sightings map is more than a collection of pins; it’s a tool for the curious, the believers, and the skeptics. Consequently, ZeeMaps’ new feature turns your quest for the truth to now vividly pinned to the canvas of America’s landscape, each label a testament to the enduring mystery of the skies.

Finally, remember, the truth is out there, and now it’s mapped out, too.

Use Our Spreadsheets to Create Your Own Map

Download our UFO Sightigs spreadsheets below to create your own map. It’s easy!

1: Create your map

2: Share on social

3: Tag ZeeMaps! #ZeeMaps #WeMapYourLists

Zip Code Lookup on a Map with ZeeMaps

ZIP codes are a system of postal codes used by the United States Postal Service. ZeeMaps supports Zip Code Lookup, using the View -> Zip Code Lookup menu item on your map.

Zip Code Lookup for Texas

For example, suppose you want to lookup all Zip codes for the state of Texas. Highlight the state of Texas, using the Additions -> Highlight Regions -> States on your map.
Then, once the state of Texas has been highlighted, select the menu item View -> Zip Code Lookup, and click an the highlighted Texas region. You’ll get a list of all Zip Codes in Texas.

Zip Code Lookup result for Texas
Zip Code Lookup for Texas

The same feature can be used to lookup Zip Codes of a particular city, county, or an arbitrary building. You can click on a building to get the Zip Code of the building instead of the area. You are not limited to using pre-defined regions for doing a zip code lookup. Since ZeeMaps allows you to define arbitrary areas like  circles, rectangles, polygons and hand-drawn, you can lookup zip codes for any region on the map.
Unlike the US Postal Service’s Zip Code Lookup service, with ZeeMaps you can easily lookup zip codes for an entire region, instead of having to do it one zip code at a time.
When you click on an highlighted region, the lookup is done for the entire region. If you want to find the zip code for a point within an highlighted region, first click outside the region and then move the zip code locator to the point inside the highlighted region.

Map Location Search & Export List

The map location search capability in ZeeMaps allows you to search your map based on marker field values and geography, e.g., you can search for all “Gold” customers in California in a customer map on ZeeMaps.

First, use the View -> Search menu item on your map to bring up a search dialog as shown below:

Search Dialog Map Location
Search Dialog

How to Search the Map Locations

Section A of the search dialog is for limiting the search results to values in your marker fields. First, this input in this section allows you to select the field to search. Next, this drop-down is for selecting the predicate (e.g. contains, equals, etc.). Third, this input box is for the value to search. You can click on the AND or OR buttons to add up to four clauses for searching marker fields. Example: Name equals Jill

Section B allows you to combine your field search by distance or geography. Therefore, you can specify an address and a distance to limit the search results within a certain distance of your address or map location. Now, if you have highlighted regions in your map, e.g., the state of California, then you can limit the search results by clicking on the highlighted region. Normally search results are limited to 200 entries.

You can increase or decrease this number in Section C.

Then, to search the map locations, hit the Search button. You should see the status line at the bottom right of the map change. Now, it will reflect the number of entries that matched your search.

Export Matched Map Locations

Lastly, if you want to get a list of entries that matched your map location search and put them in a spreadsheet, you can hit the “Export CSV” button instead of the “Search” button. Normally, only map Admins are allowed to export the search results as CSV.

If you have any issues opening the .csv in excel try following these steps.

In case you want your members or viewers to also be able to export search results, use the Map -> Settings menu item and then the Map Security tab to change the default settings.

List markers within a region

To list all markers that fall within a region, use the menu item View -> Search. In the resulting dialog, as shown below, customize your search. We’ve highlighted the part that you need for setting the desired region.

Customize Search Dialog
Search customization dialog

Click on the “Map Select Region” to select the region for limiting the search. You can combine it with any of the other clauses, e.g., names that contain the string ‘doctor’, etc. You should have defined at least one region on your map (using the Additions -> Highlight Regions menu item) for this to work.
Once you’ve set the parameters, hit the “Search” button. This should limit the marker display on the map to only those markers that meet your search criteria and are within the selected region. To see the count, look at the status bar at the bottom right of the map. To see a list, click View -> Show List menu item. To get a list to print, click on the Print button in the search dialog.

World Map

You can easily get a customized world map image with  ZeeMaps.

Click on Map to get larger poster sized image

First, create a map using the “Create a Free Map” button on the ZeeMaps site.
Use the Additions -> Add Marker menu items on your map to add your own locations to your new map. You can also add multiple locations in batch by using the spreadsheet uploads options.
If you want to highlight certain countries, states, etc., use the Additions -> Highlight Regions menu item.
Once you have your customizations done, you can get a world map by using the Print or Share -> World Map Image menu item, which will bring up a customization dialog:

Customize Image
Customize your World Map image

Use this customization dialog to customize your image, e.g., set the size, resolution, kind of markers (pins) to show your location, etc. Experiment with different customizations by hitting the Preview button. Once you’re satisfied with the Preview, enter your payment information and hit Order.
The image of a world map will be generated and stored on our servers. You’ll get a link to download the image. Remember the link URL in case you want to retrieve the image later.
Here another world map of the image at the top of this post, as a regular map instead of a satellite image.
Click on image to get the poster-sized map