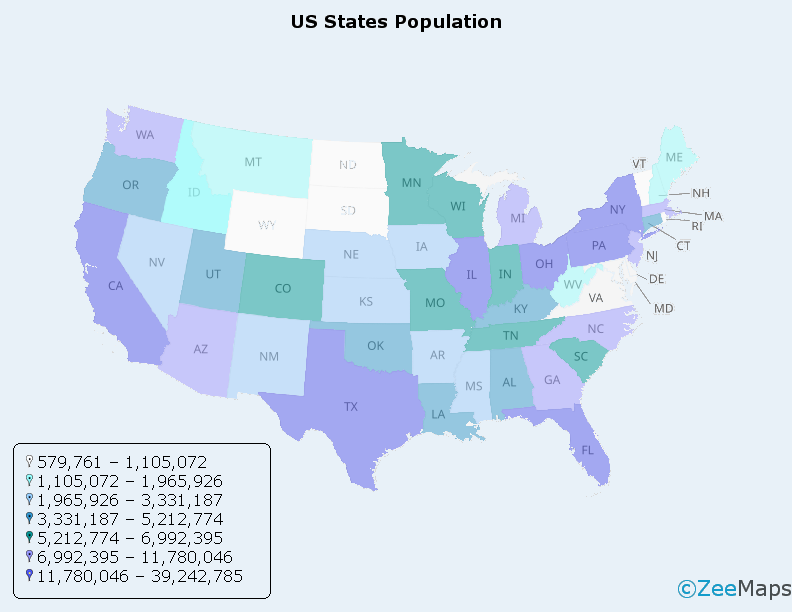
World Map Picture – Image Overlays on Maps

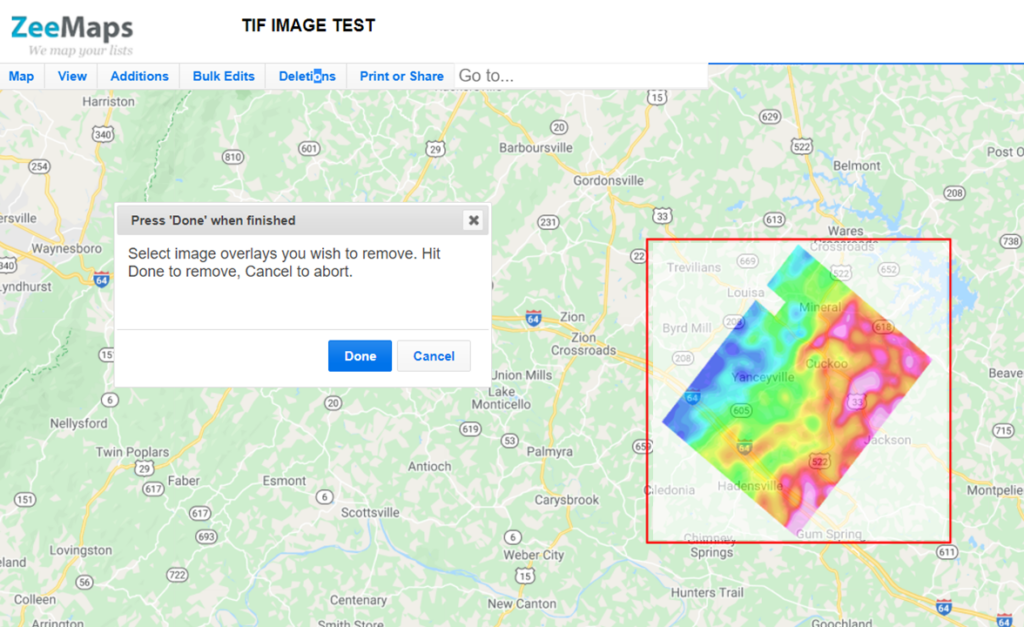
You can now add image overlays on your maps with ZeeMaps – think of the possibilities of world map pictures! This can be helpful, e.g., if you want to display a detailed campus map. Or, perhaps you have another image you would like to see referenced in your map. Follow the instructions below to get started.

How to Add Image Overlays (World Map Pictures)

To add an image overlay, use the Additions -> Add Image Overlay menu item on your map.

world map picture - add image overlay

Once you click on the menu item, a dialog on the map will give you four steps to follow to add your image overlay.

First, drag-and-drop the image that you want to add to the map. The picture you place on your map can be of anything! In the image below, we placed a mandala as an example.

Next, for Step 2 you will need to adjust the size and position of the image. You can re-position the image manually by using the handles on the rectangular boundary on the image. For Step 3 you will select an opacity. The smaller in number the opacity, the more transparent your image becomes.

world map picture opacity

The final Step 4 is to simply click Save.

Using a GeoTiff or Georeferened Image

If your image is a GeoTiff image, ZeeMaps will determine the coordinates of your image automatically and correctly position the image or picture on your world map. For a good overview of the various formats for storing geographical information, please see The Ultimate List of GIS Formats and Geospatial File Extensions.

Otherwise, you will have to manually adjust the size and position of your image, as shown in Step 2 above. Please note, images must be less than 10MB. To learn more about GeoTiff images, check out this site: https://www.gislounge.com/what-is-a-geotiff/

After you have added your GeoTiff, try adjusting the opacity as shown above.

Delete Image Overlay

Should you want to delete an image overlay, it is straightforward to do. From your map, navigate to the Deletions tab in the top menu. Then, click Delete Image Overlays. A dialog will give instructions on what to do next to delete the image or picture from your world map.

You will select the image overlays you wish to remove. Then, a red box will appear around the image as shown below.

To remove, hit ‘Done.’ However, if you wish to abort, simply select ‘Cancel’.

Create Your Own World Map Picture

1: Create your map

2: Share on social

3: Tag ZeeMaps #ZeeMaps #WeMapYourLists


We cannot wait to see what you create!


Map Marker Images as Icons

ZeeMaps allows you to change the pin icons on your map by color. For example, you can replace all the red pins with an image icon of your choosing. The Voting Location map shown below is an example of this.

Map Marker Images as Icons

Sometimes, however, you might like to show the picture or image stored with a marker as the icon for that marker.

For example, if you have a set of sales people marked on a map you can show a picture of each person for their pin. And with our Chupacabra & Other American Monsters Map, you can view images of the monsters as your map marker icons!

Map Marker Images as Icons

How to Display Images as Marker Icons

ZeeMaps allows you to add an image with each marker.

To dispay images as marker icons, go to the Map -> Settings page and then select the ‘Marker Display’ tab. Next, check the box for ‘Use marker picture as icon when available’ and hit Save Changes above the list. Once you enable this setting, any marker that has a picture associated with it will have that picture shown instead of the regular ‘teardrop’ pin.

Pixabay is a good resource site, where you can snag some picture icons, as well as map ideas and images!

Change the Picture Icon Size

If you need to adjust the size of the picture icons, you can use the menu item Map -> Marker Icons on your map. For a given colored pin, you can set the size in terms of width x height. The default is 20 x 34 pixels.

So, if your map markers started off as red map pins, then you would alter the size for that color, as shown below.

Image Marker Sizing

For example, as mentioned above, we recently created the Chupacabra monster map with ZeeMaps. For each monster found in the US, we’ve added a picture of that monster as its pin. With the setting of ‘Use marker picture as icons’ it’s easy to see at a glance where each monster is found.

Create Your Own Pictures as Icons Map

1: Create your map

2: Share on social

3: Tag ZeeMaps #ZeeMaps #WeMapYourLists


We cannot wait to see what you create!


US Map – Get Map of USA Images using ZeeMaps

You can get US Map images from ZeeMaps in different sizes and resolutions, e.g., to print out a wall-poster, or include in a PowerPoint slide.
On your interactive map in ZeeMaps, click the Print or Share -> PDF/PNG Image menu item to get the dialog to customize your image.

Print Image menu item and customization dialog
Dialog to customize your print image in ZeeMaps

The first option in the customization dialog is for selecting the “Geography” of your image. This allows you to choose from one of the following options:

  • Cover Markers – include all the pins or markers that are placed on the map
  • Map View – use whatever is visible in the map window currently
  • Select Area – select an area of the map using a rectangle
  • US Map- make a US Map (possibly with Hawaii, Puerto Rico and Alaska included)
  • World Map – map of the world

US Map of Used Computer Stores

Select the option for “US Map” to get an image of a US Map with all your customizations overlay’d on it. For example, here’s an image generated from our Used Computer Stores map, with Alaska and Hawaii excluded:

US Map of Used Computer Stores

We can also generate a US Map image with Alaska and Hawaii included:
US Map of Used Computer Stores with Alaska and Hawaii

The images are available as a political map with state boundaries, or as a satellite map:
US Map of Used Computer Stores, Satellite Version

Finally, if you want, you can highlight certain regions on the map, e.g., below we highlight California and Texas:
Map of USA with States Highlighted

In this post, we’ve shown a limited set of samples of US Map generated with ZeeMaps. The image customization dialog contains a whole other set of customizations, e.g., selecting the type of markers on the map, the size and resolution of the image, whether you want the markers labeled or not. We invite you to experiment with the myriad of options and contact us in case you need some assistance.

World Map

You can easily get a customized world map image with  ZeeMaps.

Click on Map to get larger poster sized image

First, create a map using the “Create a Free Map” button on the ZeeMaps site.
Use the Additions -> Add Marker menu items on your map to add your own locations to your new map. You can also add multiple locations in batch by using the spreadsheet uploads options.
If you want to highlight certain countries, states, etc., use the Additions -> Highlight Regions menu item.
Once you have your customizations done, you can get a world map by using the Print or Share -> World Map Image menu item, which will bring up a customization dialog:

Customize Image
Customize your World Map image

Use this customization dialog to customize your image, e.g., set the size, resolution, kind of markers (pins) to show your location, etc. Experiment with different customizations by hitting the Preview button. Once you’re satisfied with the Preview, enter your payment information and hit Order.
The image of a world map will be generated and stored on our servers. You’ll get a link to download the image. Remember the link URL in case you want to retrieve the image later.
Here another world map of the image at the top of this post, as a regular map instead of a satellite image.
Click on image to get the poster-sized map

Displace Markers to reduce clutter

Sometimes map markers (pins) can get cluttered on the map if they are too close to each other. Other times markers can overlap, causing just the top one to be visible.
We’ve added the ability to “Displace Markers”, that allows you to un-clutter close or overlapping markers.
To displace a marker, click on the marker to show the information bubble. Then, click on the first icon to the right bottom of the information bubble. (You must be admin, or have added the marker, to see the icons on the right bottom of the information bubble.)
 

Displace Marker
Displace Marker Icon

A small window with the buttons “Done” and “Cancel” will appear, and you’ll be able to drag-and-drop the marker to a displaced location. A thin black pointer will point to the original location of the marker, so you know the actual geo-position.
After dragging-and-dropping the marker to a displaced location, if you click on the “Done” button, the marker will be displaced both in the interactive version of the map, and the static images. If you click on the “Cancel” button, the marker will be re-positioned at its original location.
In the above map, we had two overlapping markers. We displaced the top one, to get the following map:
Two overlapping markers separated