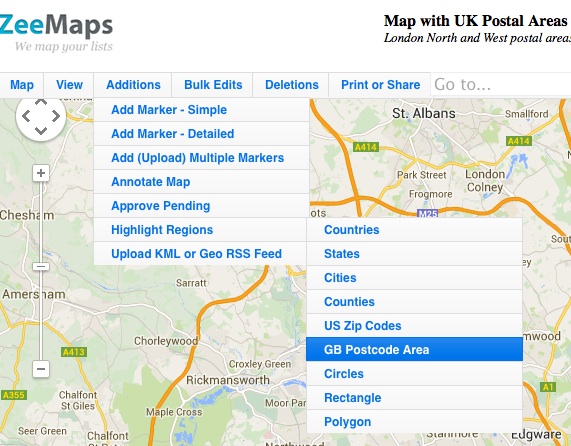
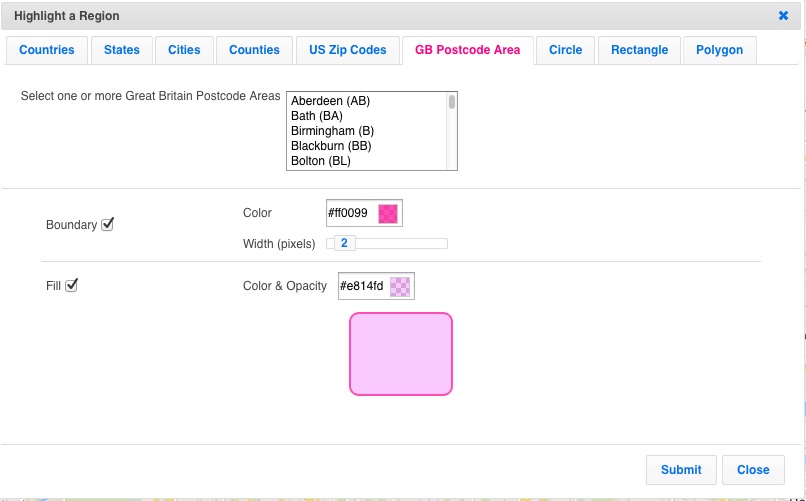
You can highlight regions on your map in ZeeMaps to get a PostCode Area map for Great Britain.

To highlight post code areas, use the Additions -> Highlight Regions -> GB Postal Areas on your map.
Then, select one or more postal areas, color their boundary and fill and hit Submit. That should highlight the postal areas on your map.

For example, here’s a map with the London North and London West highlighted:
Author: zeemaps
Share maps with other users
You can share your maps in ZeeMaps with other users, giving them controlled access.
To share your map, sign-in to ZeeMaps and go to the My Maps page. In the Owned map section, select the maps that you want to share by clicking on the map row anywhere except the title of the map. The selected rows will change to a blue background color. Then, use the Map Operations menu above the list, and the Share sub-menu within it to share the maps.

This will bring up a dialog that allows you to specify the users with whom you want to share the maps, along with access rights that you want to give them, i.e., Viewer, Member or Admin.

Once you have shared the maps, they’ll become available to the other users in the Accessible tab of their My Maps section.
You can change access rights, or revoke the sharing anytime, by going to your Shared maps section in the My Maps page. The users with whom you have shared maps can also reject a sharing through their Accessible tab.
Add users to your enterprise account
When you set up an Enterprise account with ZeeMaps, you can add additional users to the account at relatively low cost: the first 9 additional users are free and then subsequent blocks of 10 users are charged the same rate as the original plan.
To add users to your account, use the Add Users tab in your account page. Specify the additional users’ email addresses and hit “Save Changes”.

If a user with the additional email already exists in ZeeMaps, that account will be added to your Enterprise account, and the user will have the same privileges as any other Enterprise account. If a user does not exist with that email, ZeeMaps will create a new user and send a notification through email about the account details.
You can remove any of the added users using the Remove Users tab in your account page. When you remove users from your account, their account is only removed from your Enterprise plan — otherwise their account stays open with ZeeMaps.
We’ve also made it easier to transfer maps from one account to another.
To transfer maps to another account, go to your My Maps page and the Maps Owned section. Select the maps that you want to transfer and then hit the Transfer button on the menu bar. ZeeMaps will ask you to enter the email address of the new owner (twice to ensure correctness). Enter the email address of the new owner and hit Transfer.
When doing the transfer, the new account must already exist in ZeeMaps.

Enable street view on your maps
Paid subscribers can enable street view on their maps.
Use the Map -> Settings menu to get to the Map Settings page.

Once on the settings page, go to the tab for Map Display and then check the box that says “Enable street view on map” and hit submit.

You need to be a paid subscriber for the street view to be enabled on your maps.
For example, here’s a sample map with Street View enabled:
Map Location Search & Export List
The map location search capability in ZeeMaps allows you to search your map based on marker field values and geography, e.g., you can search for all “Gold” customers in California in a customer map on ZeeMaps.
First, use the View -> Search menu item on your map to bring up a search dialog as shown below:

How to Search the Map Locations
Section A of the search dialog is for limiting the search results to values in your marker fields. First, this input in this section allows you to select the field to search. Next, this drop-down is for selecting the predicate (e.g. contains, equals, etc.). Third, this input box is for the value to search. You can click on the AND or OR buttons to add up to four clauses for searching marker fields. Example: Name equals Jill
Section B allows you to combine your field search by distance or geography. Therefore, you can specify an address and a distance to limit the search results within a certain distance of your address or map location. Now, if you have highlighted regions in your map, e.g., the state of California, then you can limit the search results by clicking on the highlighted region. Normally search results are limited to 200 entries.
You can increase or decrease this number in Section C.
Then, to search the map locations, hit the Search button. You should see the status line at the bottom right of the map change. Now, it will reflect the number of entries that matched your search.
Export Matched Map Locations
Lastly, if you want to get a list of entries that matched your map location search and put them in a spreadsheet, you can hit the “Export CSV” button instead of the “Search” button. Normally, only map Admins are allowed to export the search results as CSV.
If you have any issues opening the .csv in excel try following these steps.
In case you want your members or viewers to also be able to export search results, use the Map -> Settings menu item and then the Map Security tab to change the default settings.