ZeeMaps allows you to highlight geographical areas, e.g., zip codes, counties, cities, states, or geometrical areas like circles, rectangles on your map. You can use such highlighted areas to mark out sales territories, or show service areas on a map. Often, your “region” will comprise of several smaller “geographical” areas. For example, a pizza delivery service might consist of an area composed of several zip codes. Or, a sales territory map might divide the country into several regions comprising of several states each.
Group Highlighted Regions
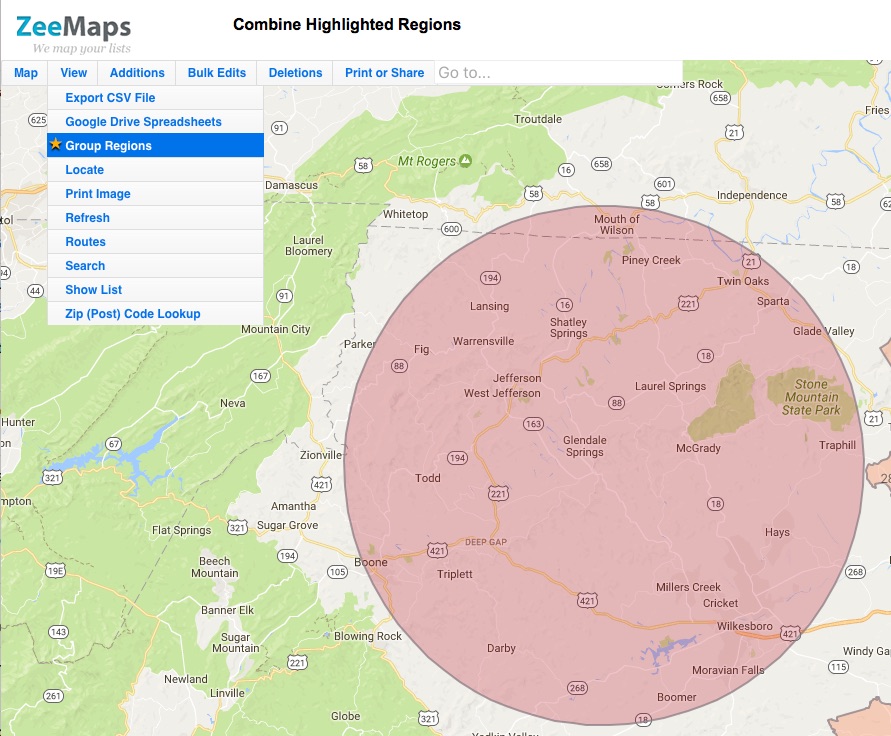
We’ve added a capability to “group” highlighted areas by color. Use the View > Group Regions menu to combine the borders of your highlighted areas. Once you do this, boundaries will be removed from all contiguous highlighted areas of the same color.
Menu item to combine regions
While the highlighted areas are grouped, you cannot add or make changes to existing areas. To do that, un-group the areas, make the changes, and then group the areas again.
Grouping and un-grouping of regions requires an active Enterprise plan subscription.
For example, here’s a map that has several US Zip Codes highlighted grouped together. Following it is a the same map without the grouped highlighted regions.
Interactive Map with several highlighted zip codes grouped together by color
Interactive Map with highlighted zip codes and other areas
ZeeMaps now allows you to highlight US Zip Code areas on a map by uploading a spreadsheet with address and color information. Previously we supported highlighting regions only few at a time. As an example, in this blog post, we’ll show you how to highlight all the Las Vegas zip codes on a map.
Las Vegas Zip Codes Spreadsheet
We collected all the the las vegas zip codes and put them in a spreadsheet. A small sample of the spreadsheet is shown below:
City, State, Zip Code, Color
Las Vegas, NV, 89101, red
Las Vegas, NV, 89111, blue
Las Vegas, NV, 89102, green
Las Vegas, NV, 89103, red
Las Vegas, NV, 89106, blue
Las Vegas, NV, 89107, green
Las Vegas, NV, 89109, red
Las Vegas, NV, 89128, blue
The complete spreadsheet of the Las Vegas zip codes can be downloaded from: Las Vegas Zip Codes.
We’ve added the “color” column to our table to indicate which color we’d like to use to highlight a specific zip code. You can modify the color later once the map has been created. ZeeMaps supports 31 different colors that can be used for spreadsheet uploads. For a complete list of supported colors, see the menu item Map -> Legend on your map.
Upload Las Vegas Zip Codes Spreadsheet to a Map
Create a map and then use the menu item Additions -> Add (Upload) Multiple Markers. This will result in a dialog that asks for the spreadsheet file: Upload Spreadsheet to Map for Las Vegas Zip Codes
In this dialog, as shown in the figure above, you can select the option to upload the data as pins or as highlighted areas for the zip codes. Since we want to create a map with zip codes highlighted, we’ll chose the option of “US Zip Code Regions”.
The spreadsheet can be in Excel file format or a CSV file. You can also copy-and-paste data from a table, or attach a spreadsheet maintained on a Google Drive. The advantage of using a spreadsheet on a Google Drive is that you can have the map be automatically updated based on changes to the spreadsheet.
Once you submit the data, a dialog will ask for confirmation of the column mappings to the field values. Make sure your columns are assigned to the appropriate fields, otherwise the data may not be mapped correctly. Confirm column mappings for Las Vegas zip codes upload
Las Vegas Zip Codes Map
After you confirm the column mappings, the highlighting of zip code areas will start. It may take a few minutes for large files. You’ll get an email report when the upload is finished. Refresh your map and it should show you the highlighted areas. Our interactive map of Las Vegas zip codes is embedded below.
Click on a highlighted zip code to see more information determined from the additional columns of your spreadsheet. In the information bubble, you can click on the title or name to get an edit dialog to make changes to that specific entry, including the ability to change the color.
When highlighting regions through spreadsheet uploads, the normal region limits apply: 5 for Basic (free) plan, 10 for Professional, 25 for Professional Publisher. In addition, the Enterprise plan is restricted to 5,000 highlighted regions through spreadsheet uploads. If you need more, please contact us for special provisioning.
Often, it is useful to show continuously updated geo maps. For example, geo maps updated by a large number of field operators. In the field, operators can indicate status change for job sites by changing the color of markers on the geo map. Similarly, crowdsourced geo maps would show updates from the field as new locations are added. For such geo maps, it is often desirable to display the geo map on a large screen, visible to several users and employees to monitor progress. This can also be useful in conferences, e.g., where each attendee marks their location of origin or interest. In classrooms, you can use such geo maps for students to mark their locations.
Manually refreshing the geo map screen every so often becomes tedious quickly. It is much better if the geo map can refresh itself every few minutes.
ZeeMaps allows you to set up your geo map for auto-refresh. Once set up for auto-refresh, you can leave the geo map visible on a browser window and it will automatically refresh itself every five minutes.
Enabling Auto-Refresh for Geo Maps in ZeeMaps
To enable auto-refresh of your geo maps, use the Map -> Settings menu to go the settings page. Click on the Map Display tab in the settings page. Check the box for “Auto-Refresh map markers every 5 minutes”. Hit Save Changes.
Map Settings Menu itemAuto-Refresh your Geo Maps
To recap, ZeeMaps provides many ways of making changes to geo map markers concurrently by many users. Users can add more locations to a geo map. They change the status of a geo map marker by changing its color. Manually refreshing the geo map on a continuous basis is tedious. ZeeMaps’ capability auto-refreshed every few minutes makes it much easier to setup overview geo maps for a groups of users.
By default, Google Maps scale is displayed at the bottom right of the map in kilometers (or meters at close range), as shown in the diagram below. Google Maps shows scale in km
If you want to see the Google Maps scale in miles (or feet), you’ll need to click on the scale to switch between kilometers and miles. This is okay once in a while, but can become irritating if you have to do it all the time for your maps.
We’ve added a new customization where you can specify that you want the scale in miles for your map.
To change this setting, use the Map -> Settings menu to go to the settings page on your map menu. Then, click on the Map Display tab, check the box for Use “Miles” scale control, and hit Save Changes. Go back to your map and the scale should now be in miles instead of kilometers. Map Settings menu item Change map scale to miles in ZeeMaps
You can get US Map images from ZeeMaps in different sizes and resolutions, e.g., to print out a wall-poster, or include in a PowerPoint slide.
On your interactive map in ZeeMaps, click the Print or Share -> PDF/PNG Image menu item to get the dialog to customize your image. Dialog to customize your print image in ZeeMaps
The first option in the customization dialog is for selecting the “Geography” of your image. This allows you to choose from one of the following options:
Cover Markers – include all the pins or markers that are placed on the map
Map View – use whatever is visible in the map window currently
Select Area – select an area of the map using a rectangle
US Map- make a US Map (possibly with Hawaii, Puerto Rico and Alaska included)
World Map – map of the world
US Map of Used Computer Stores
Select the option for “US Map” to get an image of a US Map with all your customizations overlay’d on it. For example, here’s an image generated from our Used Computer Stores map, with Alaska and Hawaii excluded: US Map of Used Computer Stores
We can also generate a US Map image with Alaska and Hawaii included: US Map of Used Computer Stores with Alaska and Hawaii
The images are available as a political map with state boundaries, or as a satellite map: US Map of Used Computer Stores, Satellite Version
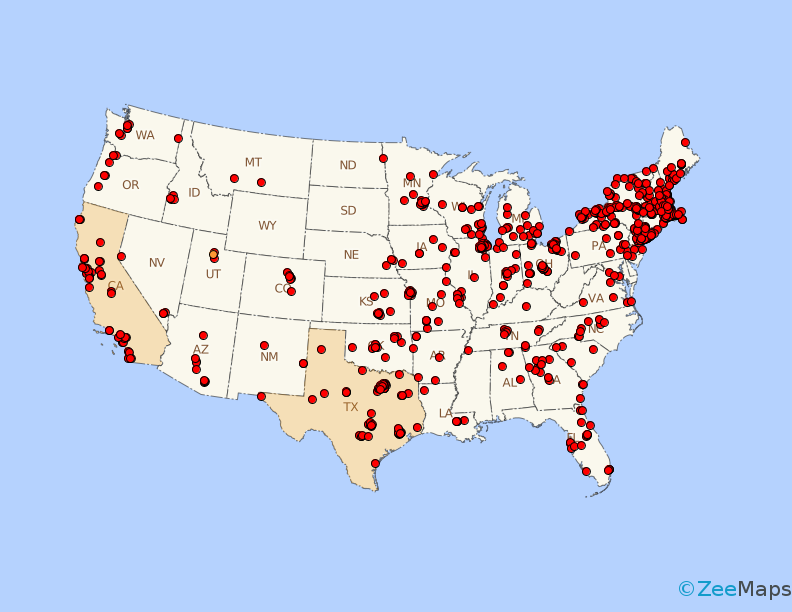
Finally, if you want, you can highlight certain regions on the map, e.g., below we highlight California and Texas: Map of USA with States Highlighted
In this post, we’ve shown a limited set of samples of US Map generated with ZeeMaps. The image customization dialog contains a whole other set of customizations, e.g., selecting the type of markers on the map, the size and resolution of the image, whether you want the markers labeled or not. We invite you to experiment with the myriad of options and contact us in case you need some assistance.